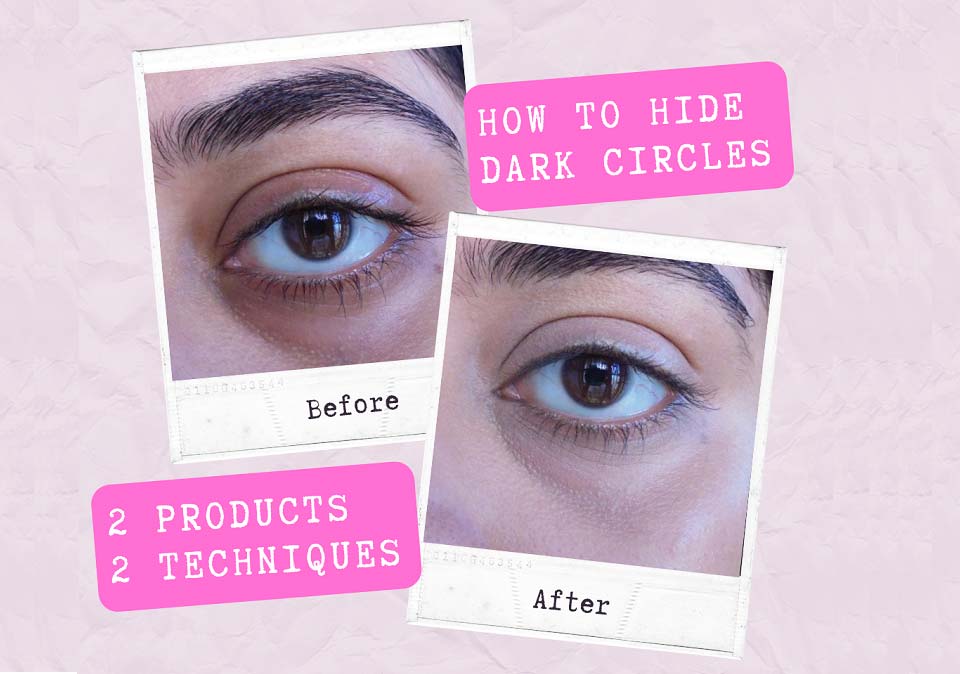
Dark circles are mostly associated with stress, bad sleeping habits, poor health conditions, etc. But, heredity is also a major factor behind intense dark circles. Take me for example. I have severe purple-toned under-eye darkness even after making serious lifestyle changes for at least 2 years. Then I realized, my dark circles are caused by purple and blue veins near the skin surface. Today, I am sharing with you 2 techniques to hide intense dark circles, by using a color corrector and without using one. I am sure, you wanna learn these.
How To Hide Dark Circles With & Without Using A Color Corrector
A color corrector could prove to be a game-changer for you if you know how to use it. It can be used under your eyes, on your acne marks, around the corner of your mouth, or any kind of discoloration that your skin might have.
What is a Color Corrector?
A color corrector is a kind of a concealer that can neutralize any kind of discoloration you might have. Correctors come in different colors based on the type of discoloration and skin tone. For example, red acne marks could be neutralized by using a green corrector while dark circles with fair skin, can call for yellow/peach corrector.
In case you are interested to know which color corrector to be used for which skin discoloration, read this article.
Which Color Corrector To Use For Dark Circles?
To choose a color corrector for dark circles, you need to also undertake your skin tone. A peach color corrector may be very well on a fair-light skin, while on a wheatish to dusky skin tone, an orange corrector is needed. Also, you need to take into account the intensity of your dark circles. In case your dark circles are intense, you might need 2 or more correctors.
Technique 1. How To Conceal Dark Circles Using A Color Corrector
Things You Will Need
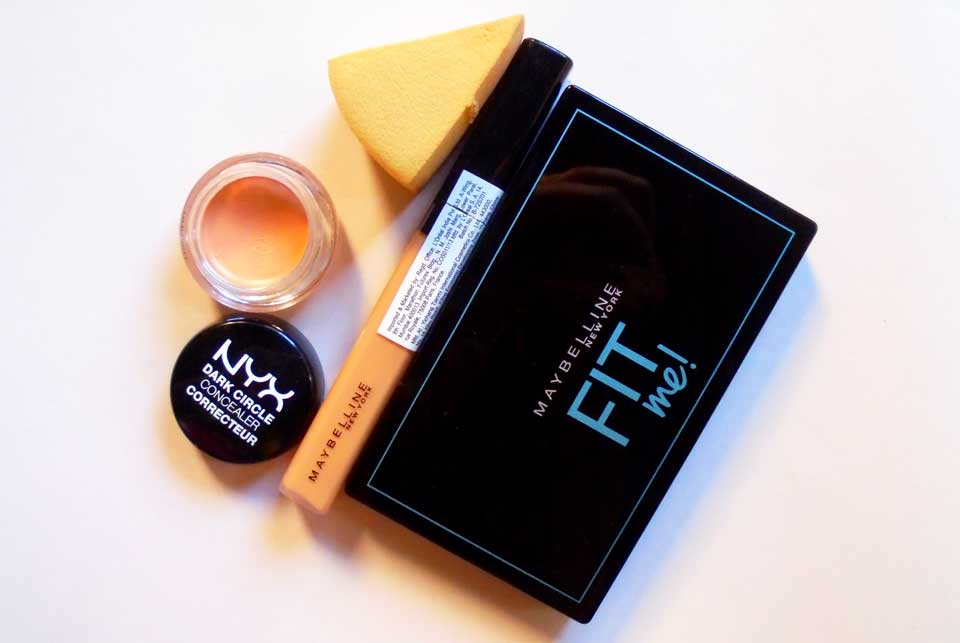
- A Color Corrector to compliment your skin tone, I am using A Peach Corrector from NYX
- Medium coverage concealer that matches your skin tone or just 1 shade lighter,
- Tinted setting powder or your regular compact with low coverage
- Makeup sponge or beauty blender
Steps To Conceal Dark Circles Using A Color Corrector
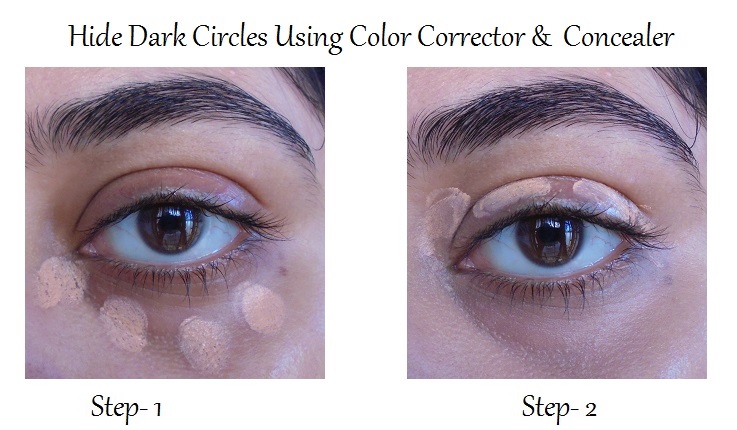
- First things first, cleanse and moisturize your skin as usual and apply a good quality moisturizer or dedicated eye cream. We want a deeply nourishing base to work on.
- Dot the color corrector only in the pigmented under-eye area and blend nicely with damp sponge. Don’t apply all the product at once. Apply little by little and keep blending until you get an even look. Do this before foundation or any other steps of base makeup.
- Let the color corrector set for 20-30 seconds and move on with the foundation for the rest of the face, in case you are using a foundation.
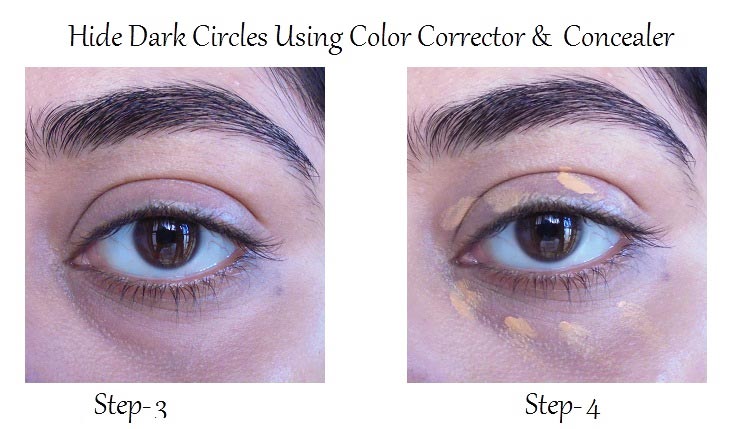
- Dot the lighter concealer on the already concealed under-eye area. Blend gently.
- Take a tiny bit of lighter concealer while highlighting the usual higher points of the face. Apply it to the inner corners of the eyes and blend it outwards.
- Set the under eyes with a very little amount of compact or setting powder. Any powder will do the job. I am using a powder foundation as it gives a slight brightening effect on the skin. Remember to use the same damp sponge for powder setting. It takes away the cakey-ness and gives a natural finish.
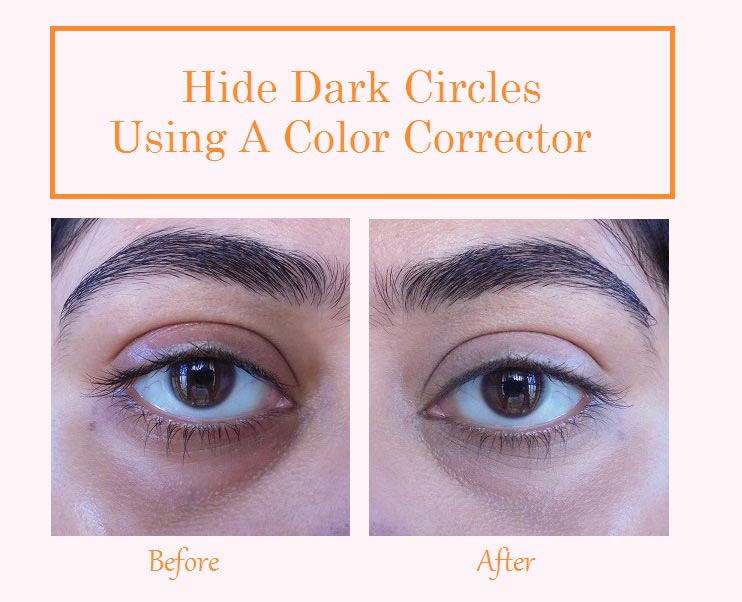
Can I Use An Orange/Red Lipstick In Place of a color corrector?
I have tried using orange lipstick, and here are a few takeaways from my experience.
- Use a red or orange lipstick only and only if your skin tone falls in medium to dusky skin. Otherwise, your under-eye area might look orangish. A Peach lipstick might be your best bet if you have fair to light skin.
- Your lipstick should have a nice fine and workable texture. It should be easy to blend.
- Apply very very little. And see if you can really use it to conceal.
- A lipstick might never set, as a corrector might set. So your lipstick might blend with the concealer and may corrupt its original tone and coverage. You might have to set it using a powder.
Why Concealer Alone Does Not Work To Hide Dark Circles?
- A Concealer is a tricky makeup. More tricky in case you have dark circles. Not everybody can asses what kind of concealer they should use. What kind of undertones they are looking for.
- Even if you have light dark circles, they might turn bit ashy or orange, after using a concealer if you didn’t use the right shade.
- Despite using medium-heavy coverage concealers, our under-eye area could look ashy, that’s because under-eye darkness needs to be neutralized and it could not be concealed using a concealer alone.
Technique 2. To Hide Dark CIrcles WIthout Using A Color Corrector
When you have a very little knowledge about color corrector or you don’t own a color corrector, you might omit using one altogether. Instead, we use 2 concealers, one that is deeper than our skin tone, and the other that is lighter than our skin tone.
- Requires Fewer Products and Minimal Skill: None of us holds professional-level skills in makeup and our makeup collection contains a few selected items only. Buying 2-3 products only for undereye concealing is not feasible also. We can still look presentable every day with this concealing. This look requires a basic level blending skill and just an additional concealer to your already existing makeup kit. Isn’t it great?
- Gives Natural Finish and Lasting Result: Using correcting concealer is not as easy as it appears. Unless you use the right corrector and perfect amount of corrector, you are bound to get a blotchy orange or ashy undereye. The trick I am going to show you gives comparable coverage to full-blown color corrections. And you know what? The look lasts throughout the day!
- Easy to Touch-up: Once you have applied and blended correcting concealers, there is no way to reapply or touch-up. You have to re-do the whole base makeup which is not possible in most cases. When you are not using a color corrector, then, it is very easy to touch-up. You even have a provision to add some more coverage during touch-ups if you feel like.
Things You’ll Need

- Medium coverage concealer 2-3 shades deeper than your natural skin tone
- Medium coverage concealer that matches your skin tone or just 1 shade lighter
- Tinted setting powder or your regular compact with low coverage
- Makeup sponge or beauty blender
Steps To Hide Dark Circles Using 2 Concealers
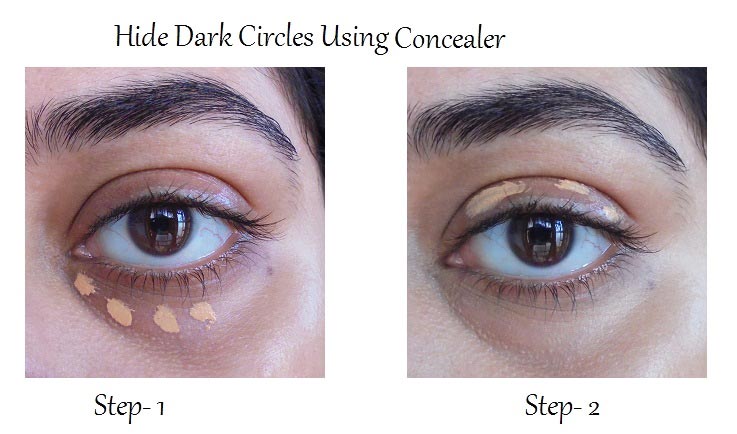
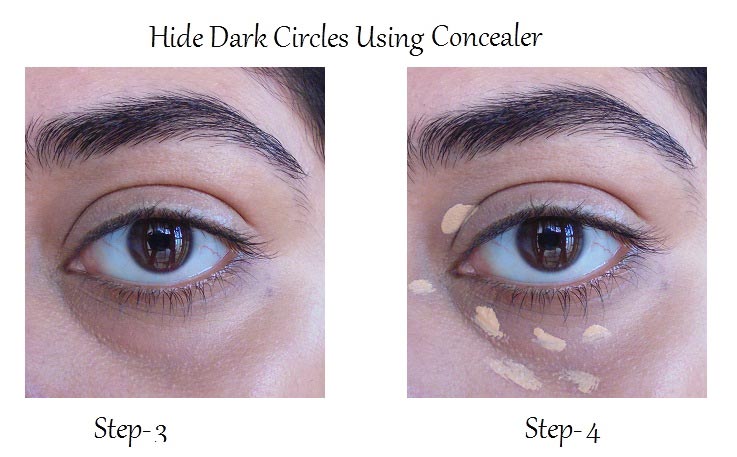
- Start with cleansing and moisturizing your skin as usual. Make sure your under-eye area is well moisturized. This will prevent creasing.
- Dot the deeper concealer only in the pigmented under-eye area and blend nicely with damp sponge. You can build the coverage as you go. Apply little by little and keep blending until you get an even look. Do this before foundation or any other steps of base makeup.
- Let the deeper concealer set for 20-30 seconds and move on with the foundation for the rest of the face. You may also go over the concealed area with it. You’ll get an even skin look.
- Take a tiny bit of lighter concealer while highlighting the usual higher points of the face. Apply it to the inner corners of the eyes and blend it outwards.
- Set the under eyes with a very little amount of compact or setting powder. Any powder will do the job. I am using a powder foundation as it gives a slight brightening effect on the skin. Remember to use the same damp sponge for powder setting. It takes away the cakey-ness and gives a natural finish.
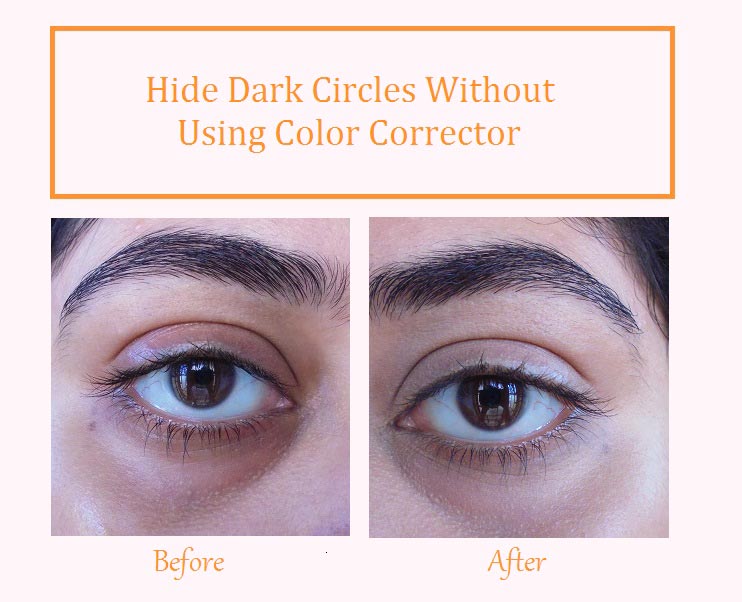
Why Does the 2 Concealer Trick Work?
Our undereye dark circle is usually 2-3 tones darker than our natural skin tone. Using the deeper concealer we are actually bringing the dark undereye skin to the same level as our original complexion. As we use the same color foundation all over the face, the concealed undereye matches perfectly to the rest of the face. Later we use a highlighting concealer just to give a nice bright touch to the face.
Instead of neutralizing the discoloration, here we are setting up a color balance on our entire face. That’s why this is a full-proof technique with minimal chances of mess-up.
How to Do the Touch-up?
Humid weather conditions, sweat, and the layering process of concealers might cause fading, melting, and creasing. Touch-up is absolutely necessary to prevent those. Carry around some dry face tissues, a makeup sponge or beauty blender, and also your trusted setting powder. First blot off the excess moisture or sweat with a dry tissue. Dab the undereye with a wet sponge. It will clear out the creases. Follow it up with tinted setting powder in the same wet sponge. You can also carry your deeper concealer to add some more coverage while touching up.
How to Troubleshoot, If You Mess Up Your Under-Eye Area?
Most of us do not possess professional skills. You might not get the desired results from the very first attempt because of certain tiny glitches. Here are some common issues you might get in the beginning and how to get past them.
- Concealer Creases in No Time: Creasing is inevitable in concealers even if you are using a super expensive one. When you are applying two layers of concealer and also a light layer of foundation. chances of creasing become exponentially higher. If that’s the case, you need to lessen the amount of concealers and the problem should go away. You may also try a lightweight setting powder ditching your everyday compact.
- Orange looking Undereye: This thing happens when your deeper concealer is too dark or warm-toned for your original skin tone and pigmented under eyes. If the color tone looks okay just the orange part is creating the problem, then try a neutral concealer from the same tone which does not have the yellow undertone. If you don’t understand tones and undertones, go a shade lighter with the deeper concealer.
- Ashy Undereyes: When you have an extreme discrepancy between your natural skin tone and under eyes, the highlighting concealer might be too light for your pigmented under eyes. That’s why you get the ashy look and bad flashbacks. There are two ways to solve this. The first way is to apply the lighter concealer in moderation and the second one is to shift to a slightly darker shade for your highlighting concealer. Generally, the first method works for most people.
Confused? If you should use a color corrector to hide dark circles?
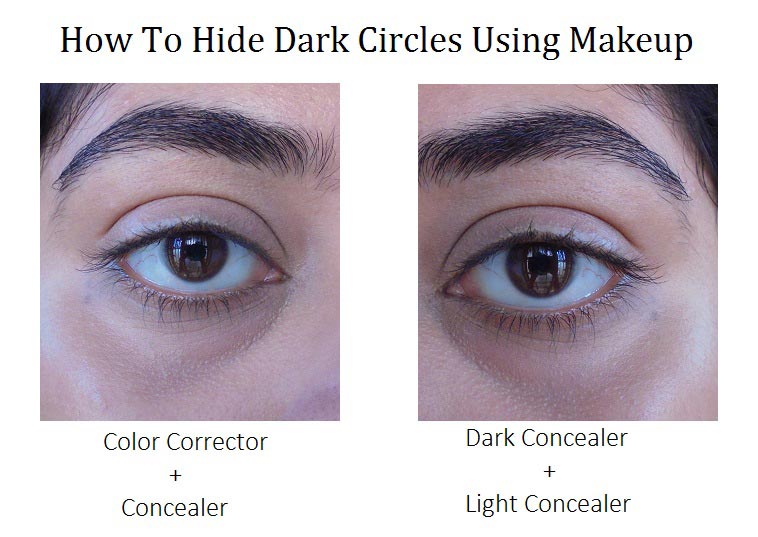
It’s obvious to get confused when you have so much promising information and tutorials. In order to find out which works best for you, you need to try out these 2 techniques by your self. For your reference, I am providing a comparative summary.
| Hide Dark Circles With & WIthout Using A Color Corrector | ||
|---|---|---|
| Corrector + Concealer | 2 Tone Concealer | |
| What | Use color corrector and a concealer suitable for skin tone | Use 2 concealers, one darker than your skin tone, another lighter than your skin tone |
| How | Apply color corrector. Blend. Apply Concealer. Blend. Set. | Apply a dark concealer on your eye area before using a lighter shade of concealer on your dark circles |
| Who | Good knowledge of color corrector, tones, shades, good blending skills | Beginner level technique, which requires, good blending skills |
| When | To achieve a flawless makeup look, good for weddings and special occasions. | For everyday Use |
| Results | Flawless | Good, Natural |
| Time | The time, taken by the techniques is comparable. It all depends, upon how much time you put into blending. | |
| Cost | The cost is comparable too, because, concealer and correctors fall in the same range. | |
Makeup can work on intense dark circles, but you can also try to minimize your dark circles. Try these resources:
- Natural Remedies for Dark Circles
- Juicy Chemistry Coffee Green Tea Eye Cream
- LA Girl Pro Conceal HD Concealer Creamy Beige For Wheatish Complexion
- L.A. Girl HD Pro Conceal Orange Corrector
- The Concealer and Corrector Game
Hope you find this article helpful and practical. Let me know in case you have any queries. Leave your comments below or email at HighOnGloss@gmail.com
Guest Post By : Sreeparna Ganguly
